curl -X POST "https://us.api.konghq.com/v3/portals/$DEV_PORTAL_ID/custom-domain" \
     --no-progress-meter --fail-with-body  \
     -H "Authorization: Bearer $KONNECT_TOKEN" \
     --json '{
       "hostname": "example.com",
       "enabled": true,
       "ssl": {}
}'Dev Portal customizations
You can customize your Dev Portals with the following features:
- Configure layout, navigation, branding, and domain settings.
- Build content-rich pages with Markdown Components, nest information, and reuse snippets.
- Manage page visibility, publishing workflow, and SEO metadata.
- Customize global appearance, apply custom CSS, and set up menus and navigation structures.
- Set up and manage custom domains, SSL certificates, and URL paths.
The preview will automatically show what your page should look like when developers view your Dev Portal. In the event that it fails to refresh after editing the page, there is a refresh button next to the generated URL at the bottom.
There are three icons above Preview that allow you to test adaptive designs in some predefined viewports:
- Desktop
- Tablet
- Mobile
Pages and content
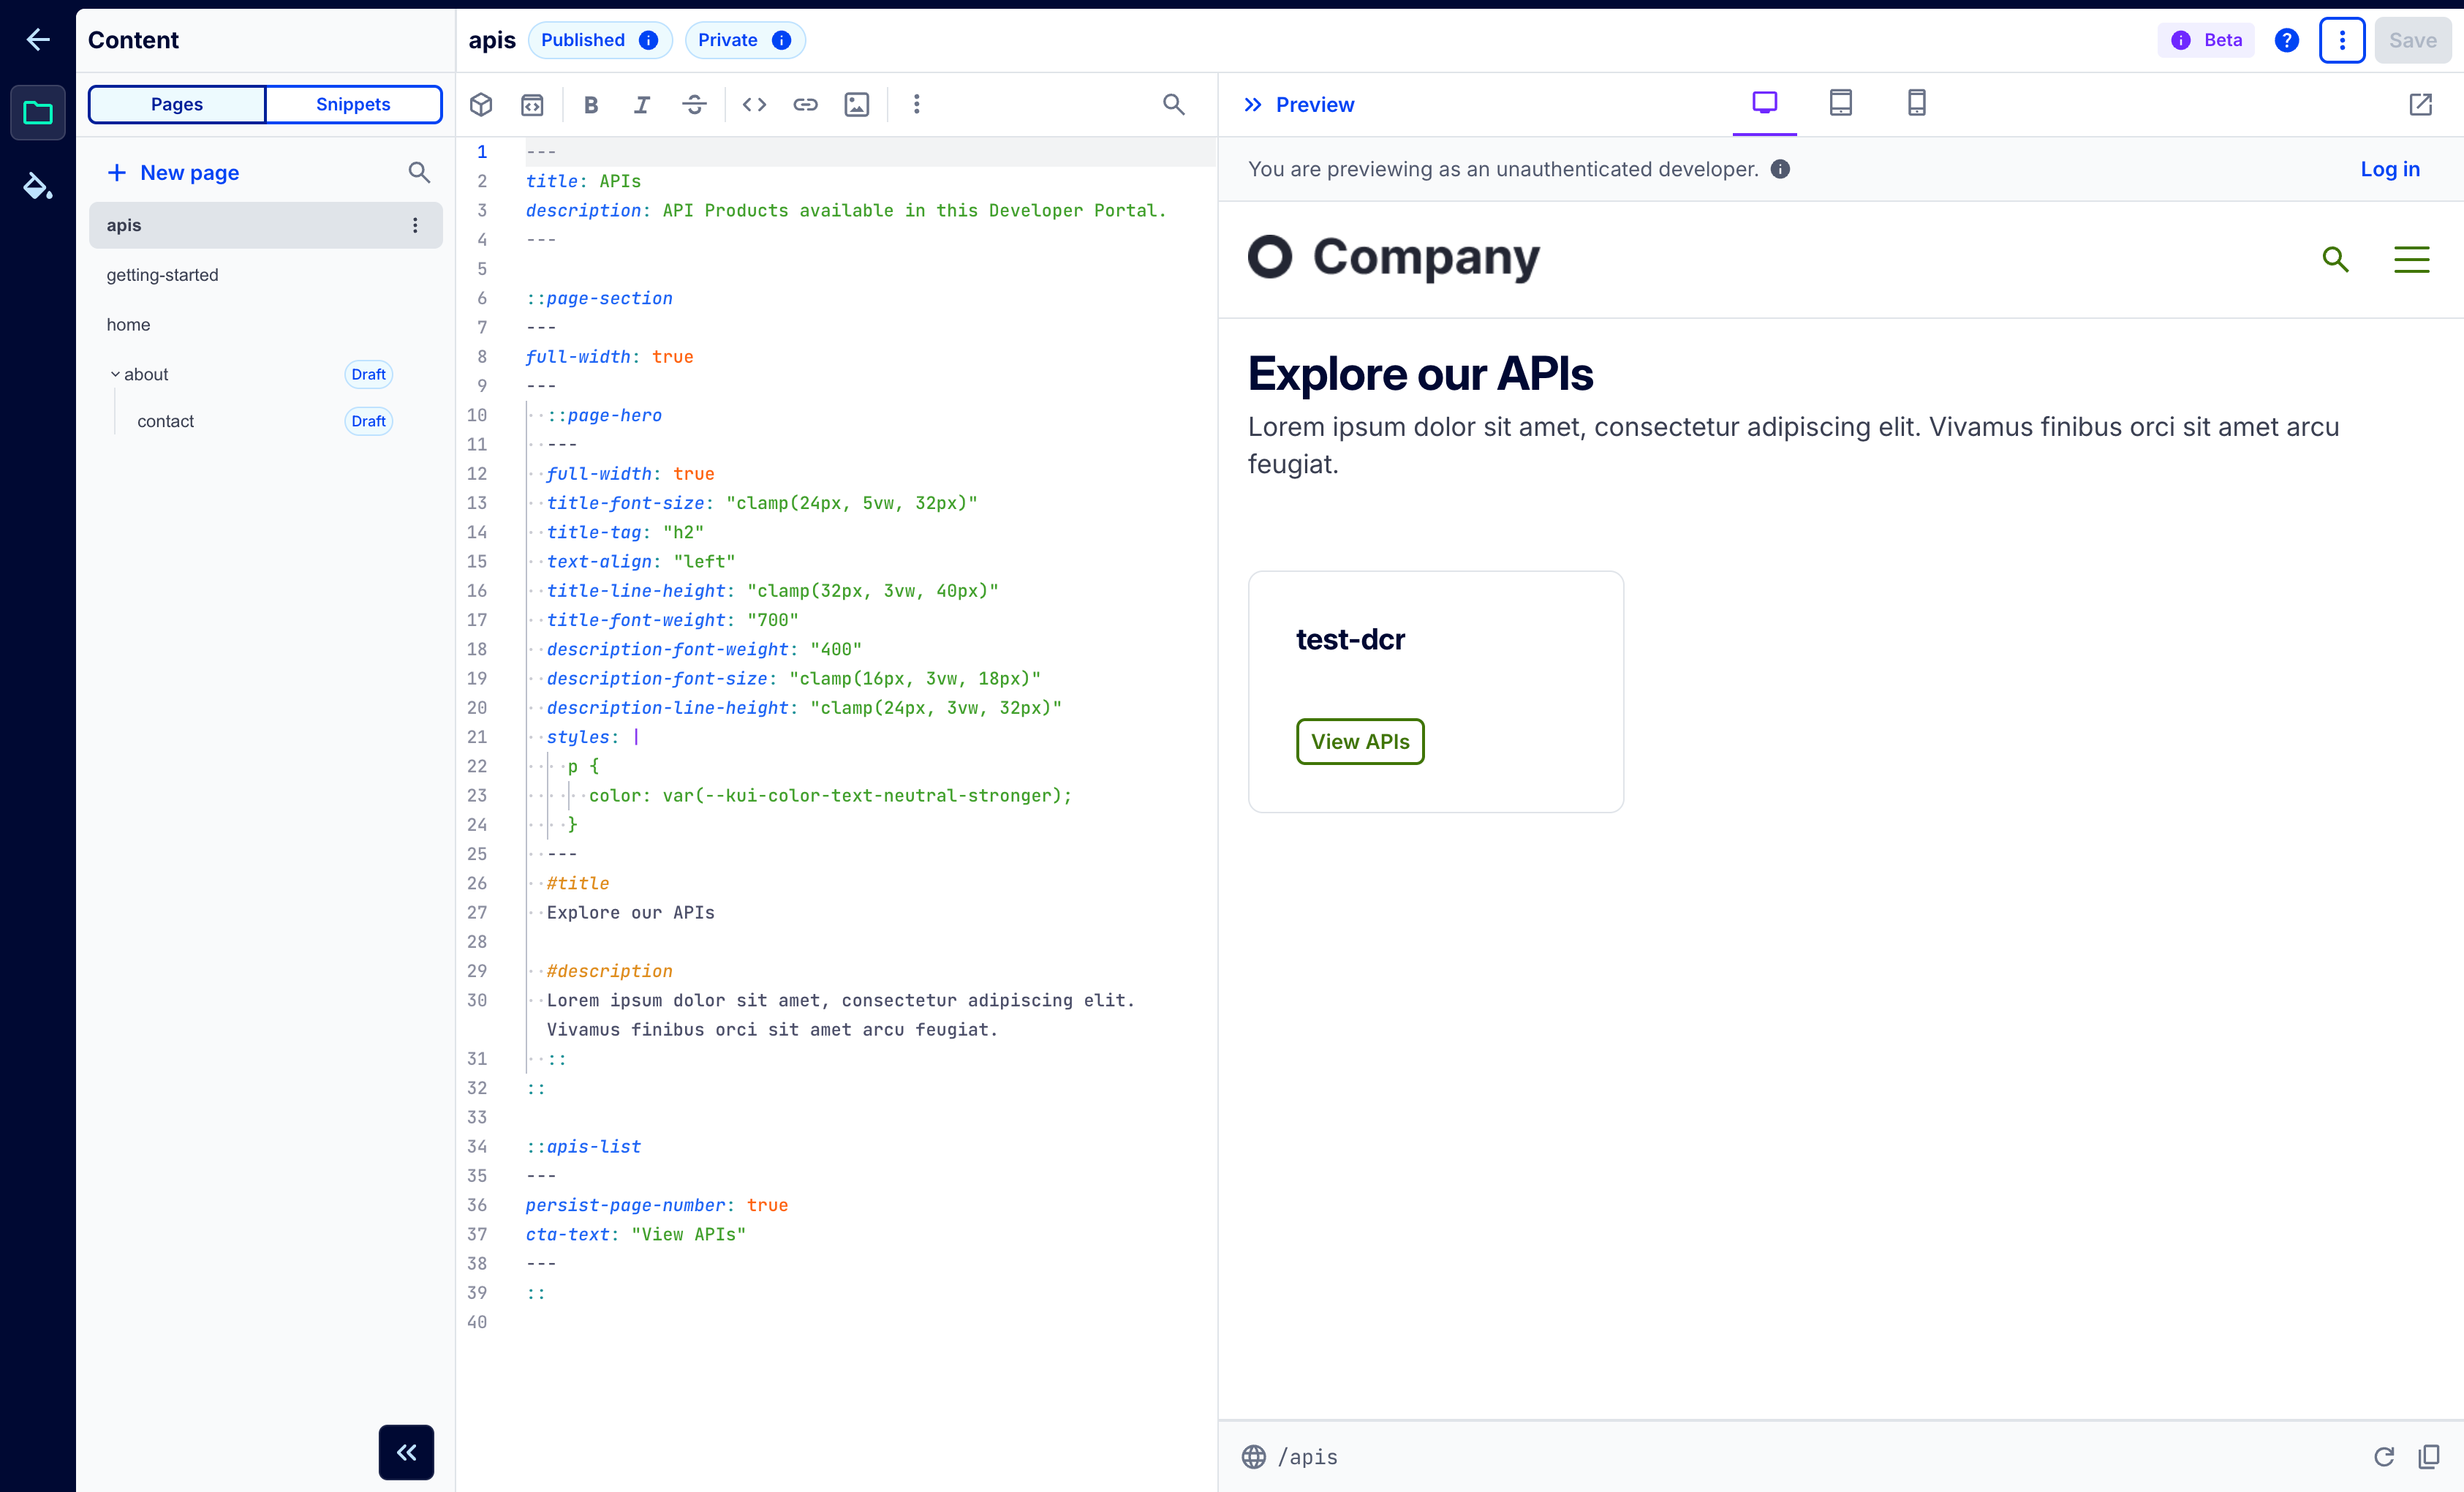
In your Dev Portal, you can create pages that contain content such as text, buttons, tabs, and more. Pages are used to convey information about your API and Dev Portal to users. They are highly customizable using Markdown Components (MDC), allowing you to create nested page structures to organize pages and generate URLs or slugs. You can also stage new pages or restrict access to logged-in developers by using visibility controls and publishing status.
To configure pages and content, navigate to your Dev Portal in Konnect and click Portal Editor in the sidebar. In the Portal Editor sidebar, click the folder icon. You can also manage pages and content using the Kong Konnect MCP Server.
Appearance
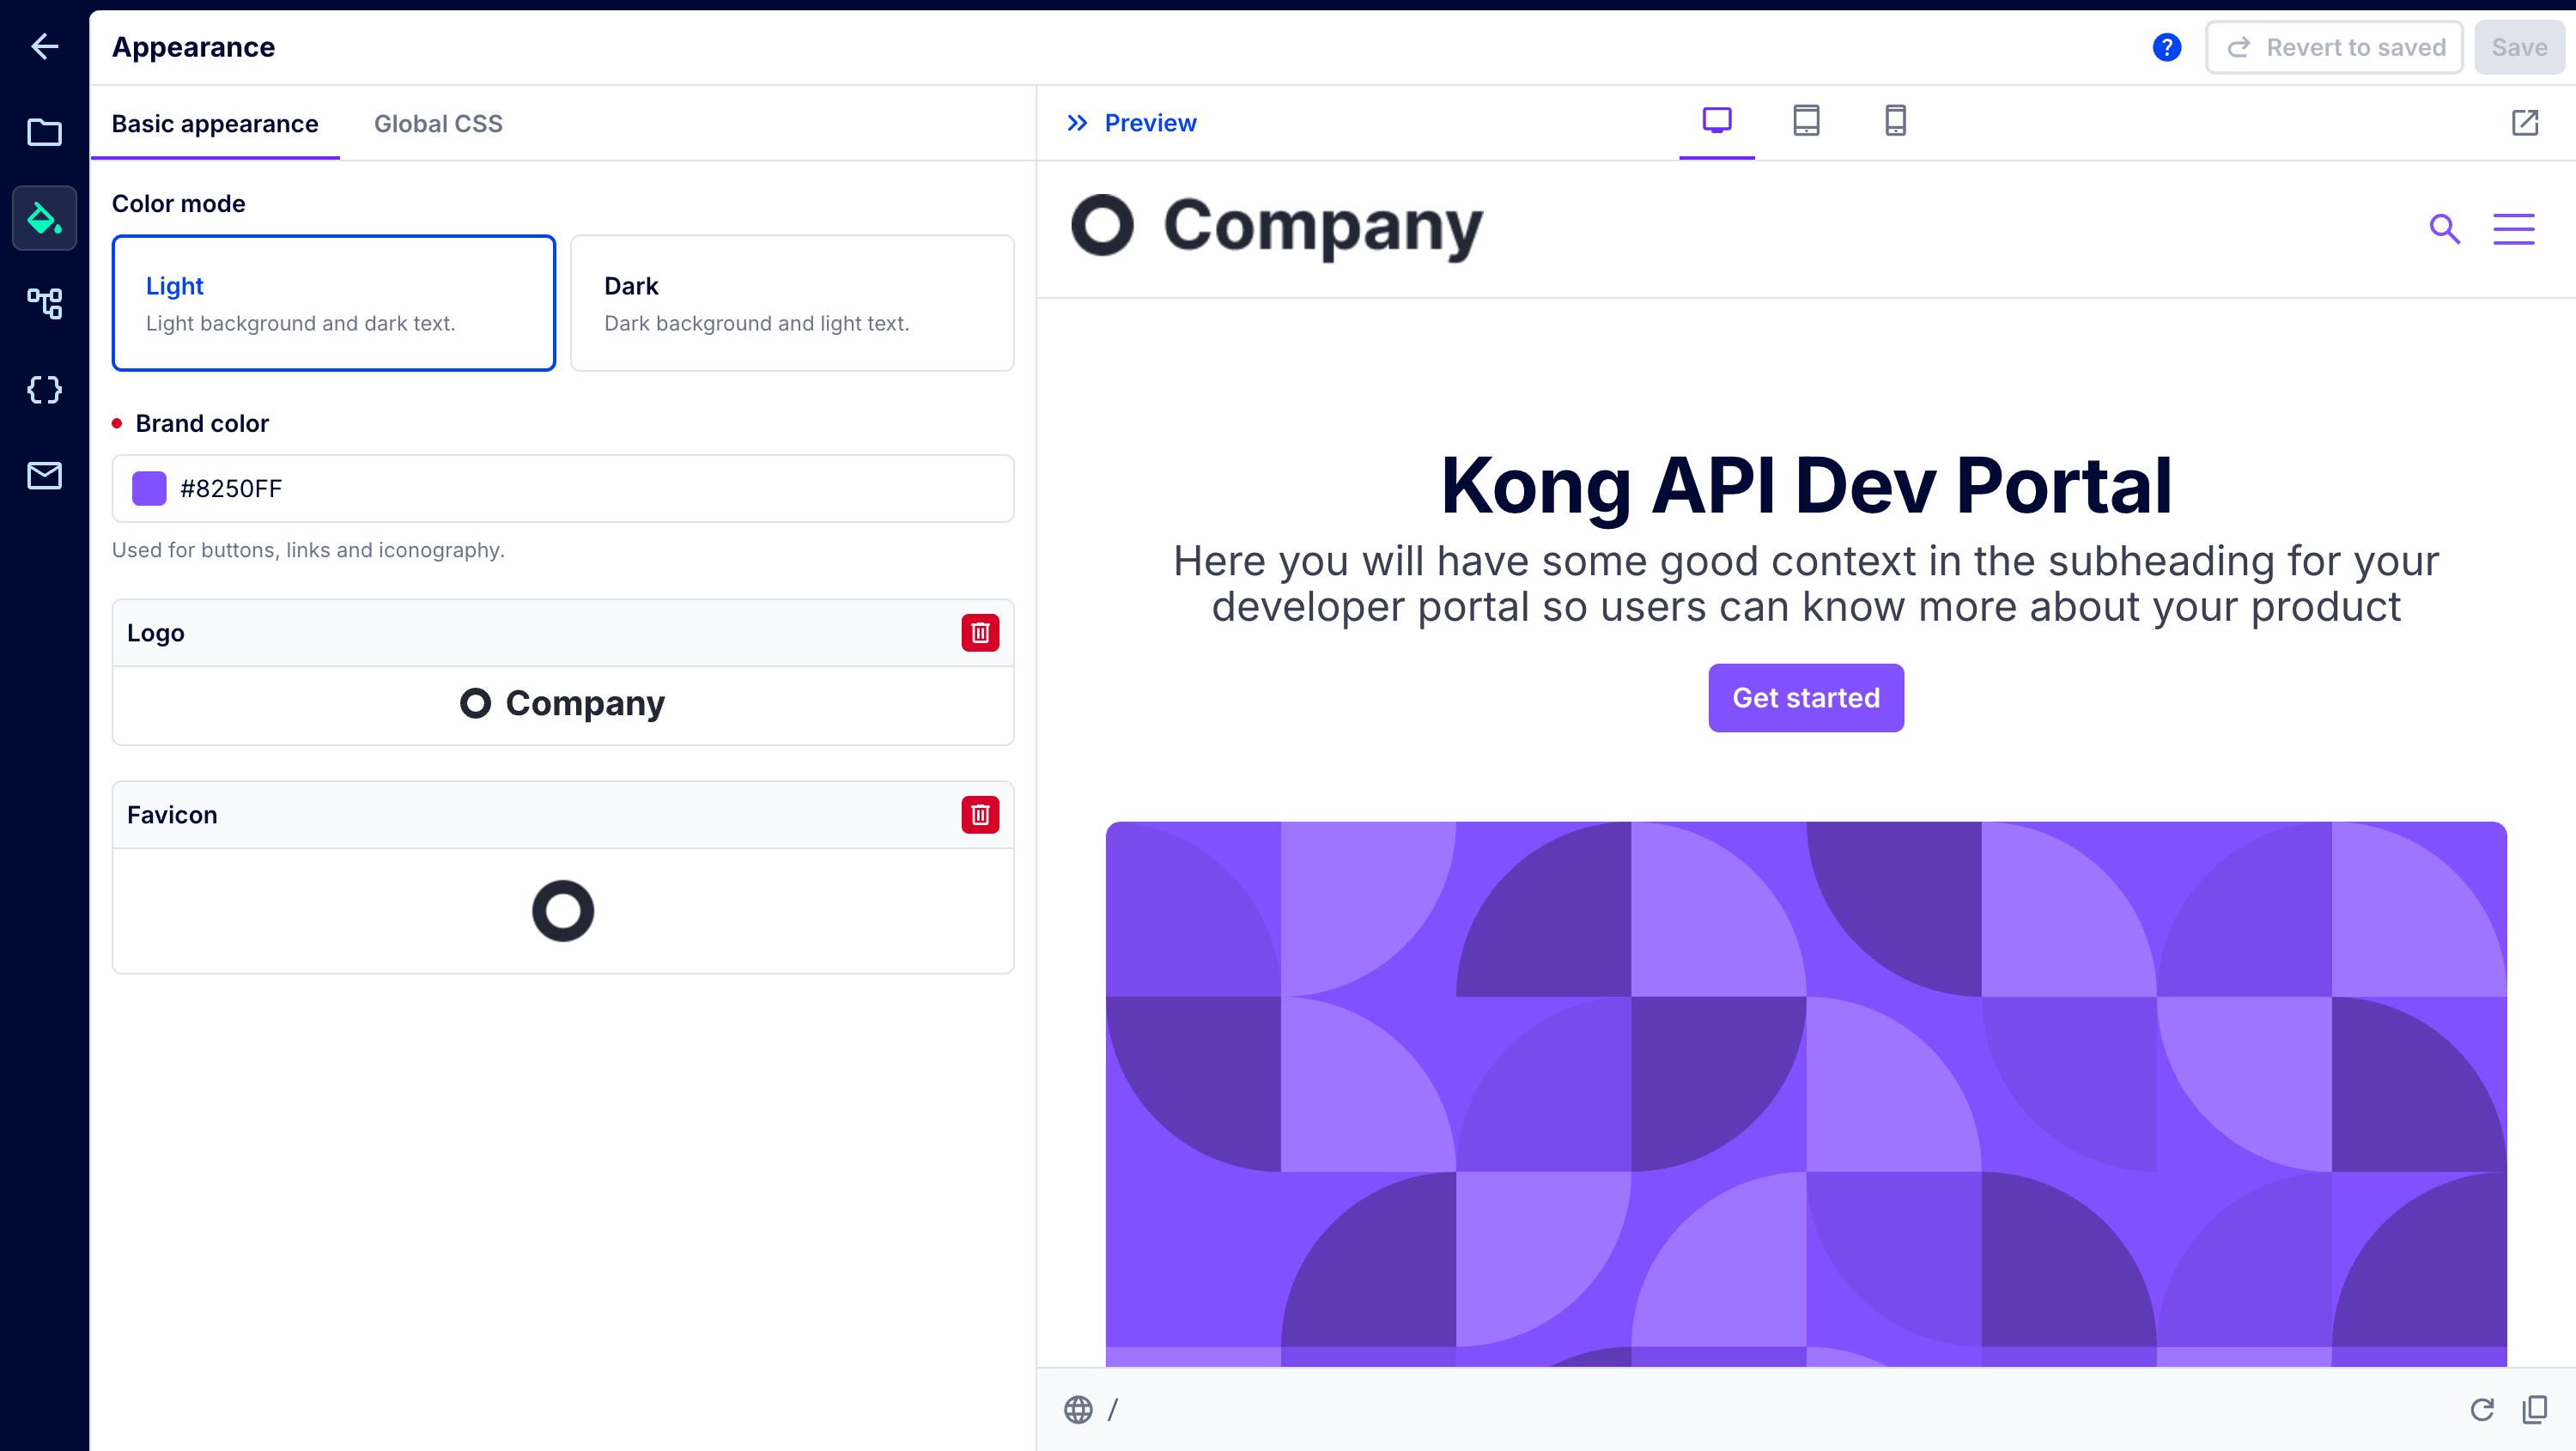
Appearance settings are applied globally to all pages in your Dev Portal. For advanced needs, you can also create custom CSS that applies custom styles to your Dev Portal. Custom CSS provides global customization to all pages in Dev Portal. To configure appearance settings, navigate to your Dev Portal in Konnect and click Portal Editor in the sidebar. In the Portal Editor sidebar, click the paint bucket icon.
Basic appearance settings quickly create basic styles for your default Portal template:
|
Setting |
Description |
|---|---|
| Theme | You can choose from default light and dark options. This changes the background and text in your default template. Dark or light theme is not selectable by developers. |
| Brand color | This color is used to set the primary color in the default template. |
| Portal logo | Automatically used in the header and footer menu sections to ensure consistent branding across pages. |
| Favicon | Icon displayed in the browser tab and Favorites for Dev Portal visitors. |
Dev Portal navigation
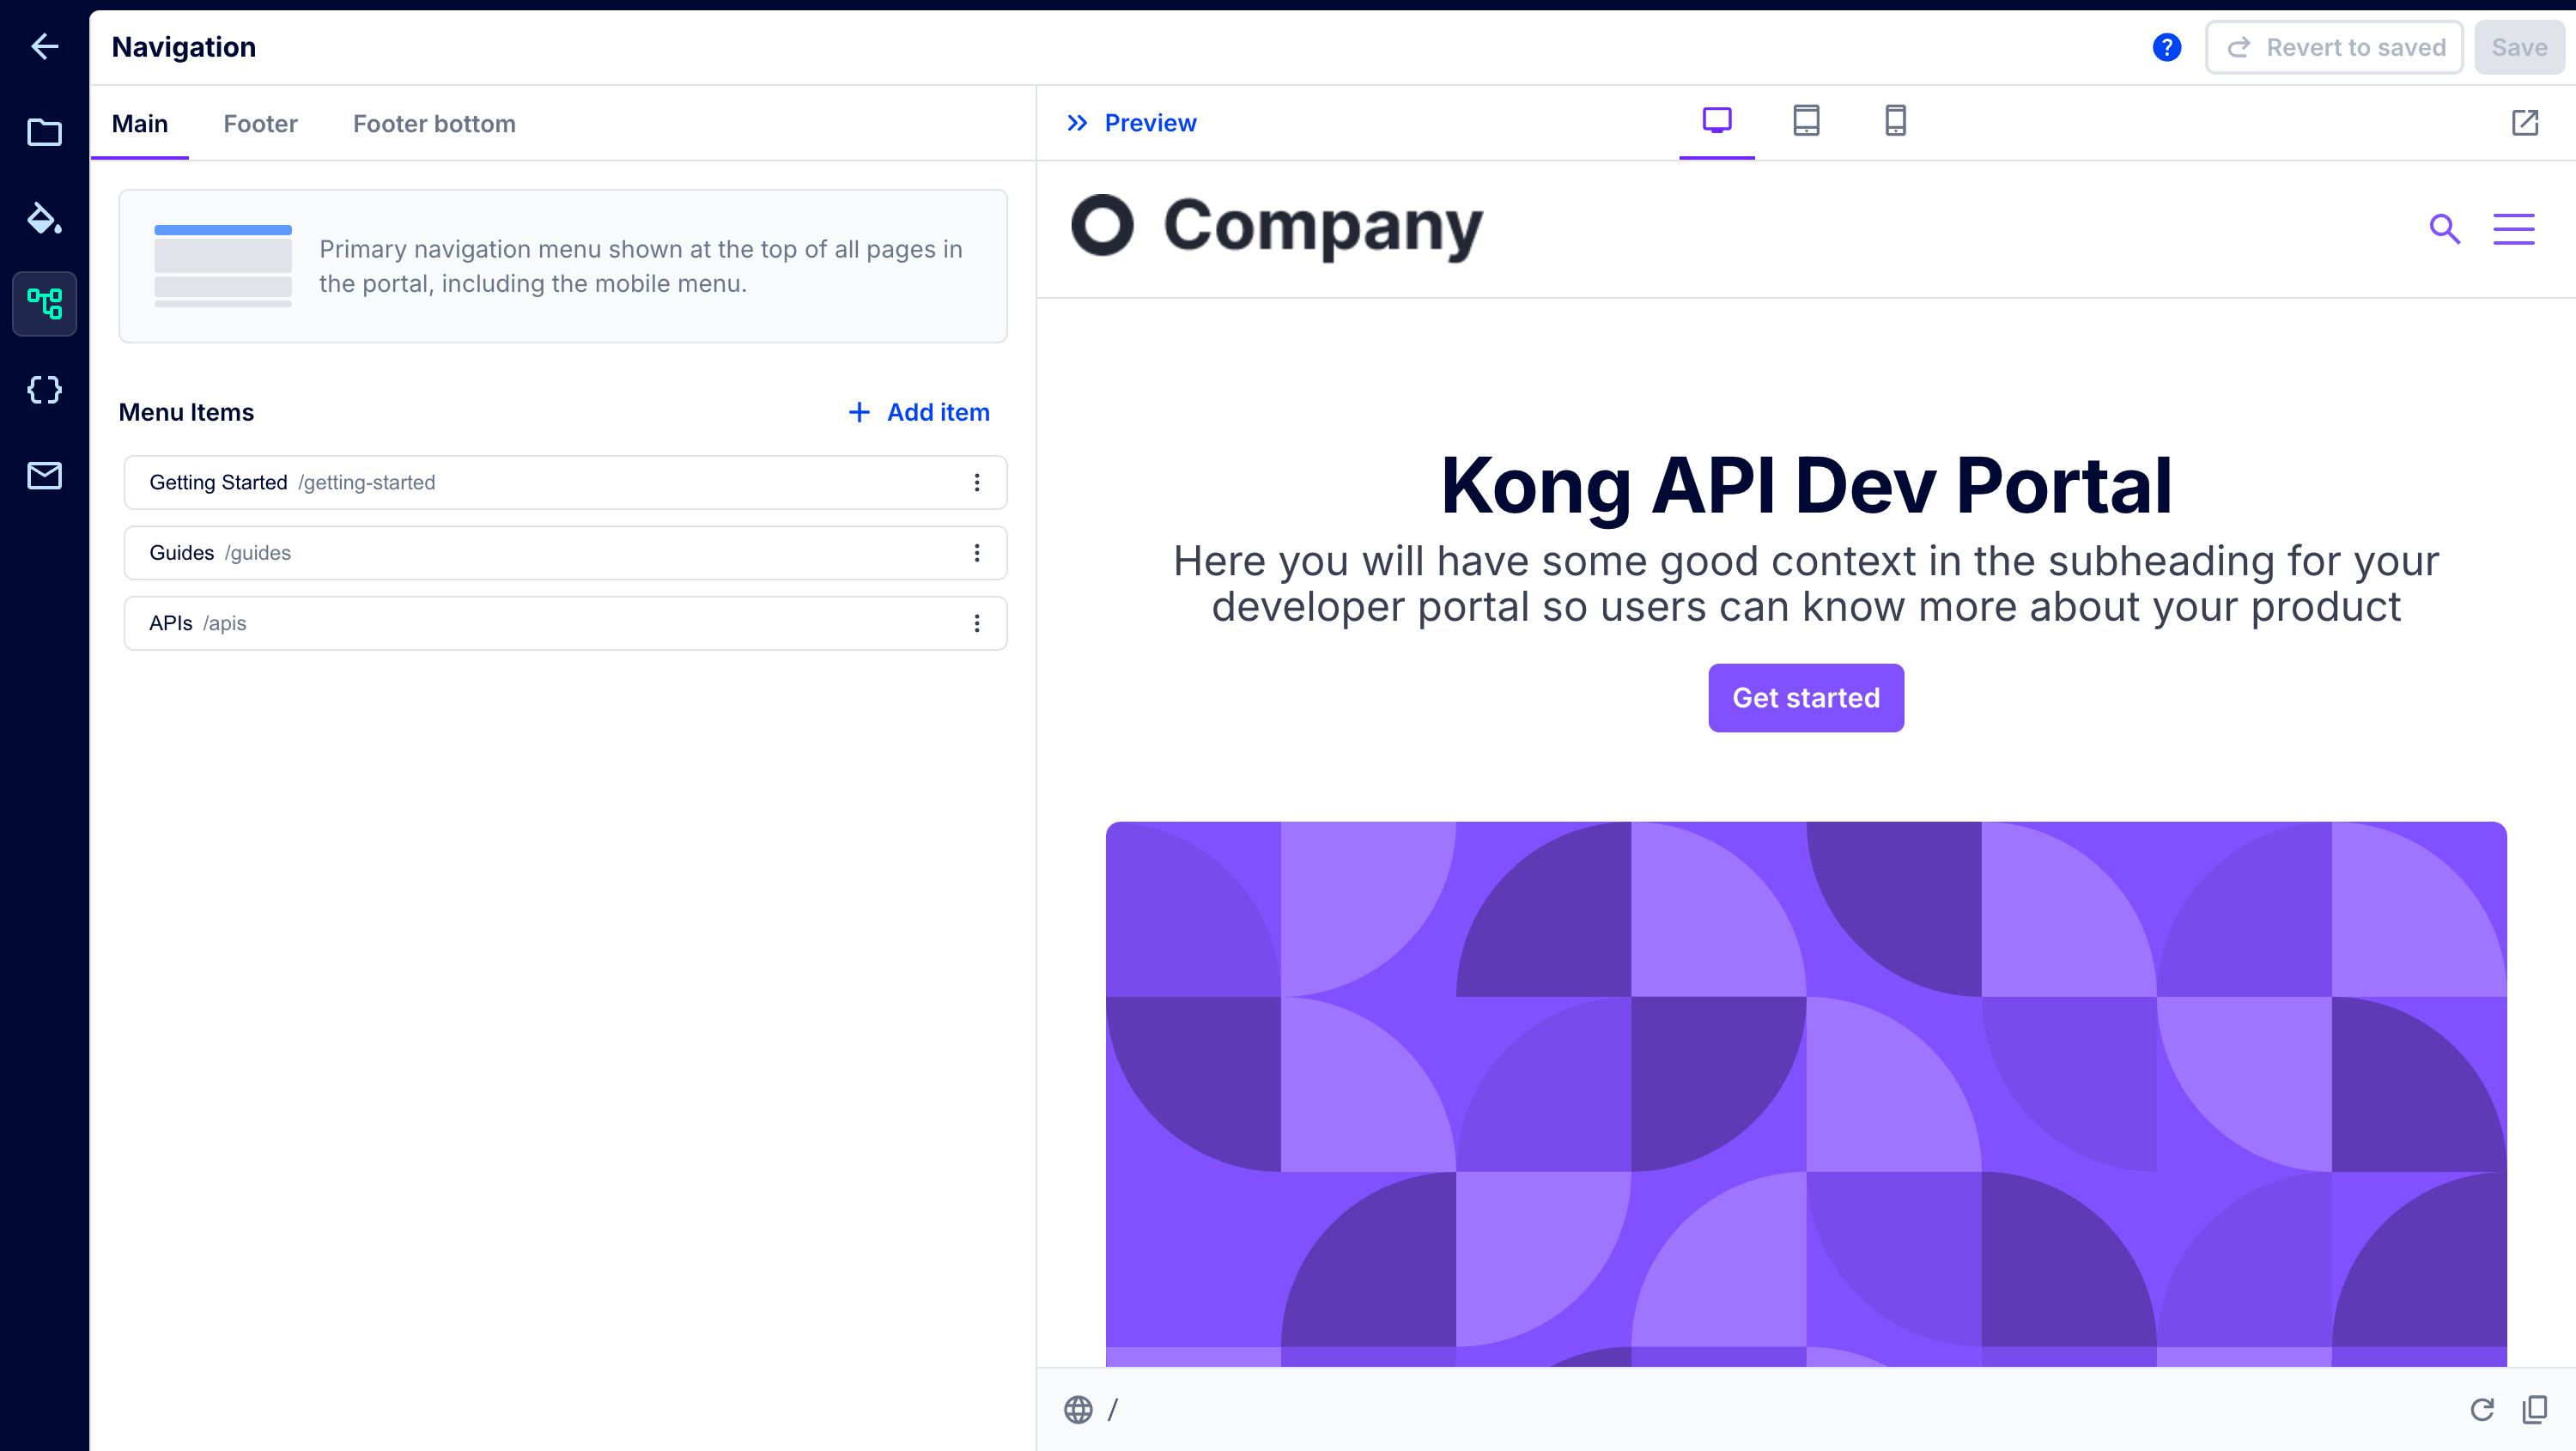
You can configure the main menu, footer, and footer bottom navigation menus in your Dev Portal. To configure navigation settings, navigate to your Dev Portal in Konnect and click Portal Editor in the sidebar. In the Portal Editor sidebar, click the menu tree icon.
- Main menu: Main menus are a flat list of links that will be added to the header of every page in your Dev Portal. These titles and links will be spaced evenly horizontally. You can also add external links to all Dev Portal menu items either using the Konnect UI or the
/portals/{portalId}/customizationendpoint. - Footer menu sections: Footer menus allow you to create a set of columns with links for global navigation. Select Footer Sections Menu from the dropdown list to begin creating your menus. Footer sections create vertical columns across the bottom of every page, with the logo from Appearance on the left side. We recommend creating your desired footer sections before creating footer menu items. Footer menu items are links to any URL you prefer, with a title to be displayed. Items must specify a footer menu section.
- Footer bottom menu: Footer bottom menu is a flat list of links that will be added to the bottom of every page. Footer bottom menus are placed below footer menu sections.
API specification settings
The API specification settings allow you to control how developers can interact with your API specs in your Dev Portal. To configure API spec settings, navigate to your Dev Portal in Konnect and click Portal Editor in the sidebar. In the Portal Editor sidebar, click the code brackets icon.
The following table describes the API spec settings you can configure:
|
Setting |
Description |
|---|---|
| Show Try it | Enable in-browser testing for your APIs. All linked gateways must have the CORS plugin configured. For more information, see Allow developers to try requests from the Dev Portal spec renderer. |
| Show Try it in Insomnia | Enables users to open the API spec in Insomnia to explore and send requests with the native client. |
| Continuous scroll | Display the full spec on a single, scrollable page. If disabled, documentation, endpoints, and schemas appear on separate pages. |
| Show schemas | Control whether schemas are visible in your API specs. When enabled, schemas appear in the side navigation below the endpoints. |
| Hide deprecated endpoints | Manage visibility of deprecated endpoints and models. |
| Hide internal endpoints | Manage visibility of internal endpoints and models. |
| Allow custom server URL | Let users define a custom server URL for endpoints. This will be used to generate code snippets and to test the API. The URL is client_side only and is not saved. |
Custom forms
Get started with custom forms: For complete tutorials, see the following:
Custom forms let you add configurable fields to the developer registration form or to a per-API application registration form, so you can capture the information you need to make approval decisions.
There are two types of custom forms:
- Developer registration form: One per Dev Portal. Once published, it replaces the default developer sign-up form. If you create the form via the API, you must include the required
full_nameandemailfields yourself, along with any other additional fields you want. - API registration forms: You can create multiple forms and assign one to each API publication. APIs without an assigned form use the default registration flow, with no extra fields.
Use cases for custom forms include:
- Assign users to a team based on their self-selected answers.
- Associate a company name with a user.
- Pass the custom data to an in-house dashboard for managing approvals.
- Capture analytics about developers by job title.
Keep the following constraints in mind when configuring a form:
- A form can have a maximum of 20 fields.
- Text field values can have a maximum of 256 characters.
- A form must contain exactly one submit field.
- Each field has a
name(a lowercase slug of letters, digits, underscores, and hyphens) that acts as its permanent identifier. Once set, it can’t be changed. Renaming a field’s label doesn’t change itsname, so previously collected data always stays linked to the field. To rename a field, delete it and create it again with the new name. - Built-in fields (
full_name,submit, andemailon the developer registration form) can have theirplaceholder,description, andlabelproperties edited, but their type and name can’t be changed, and they can’t be removed.
The table shows which field types are available when building a form.
|
Field type |
Description |
Configurable properties |
Example |
|---|---|---|---|
| Markdown content | A block of Markdown (MDC) text rendered between or above other fields. Doesn’t collect any input from the developer. |
value (Markdown content, required, up to 4096 characters)
|
## Tell us about your project
|
| Short text | A single-line text input. |
label, placeholder, description (help text, supports Markdown), required
|
Company name or employee ID |
| A single-line text input, validated as an email address. |
label, placeholder, description, required
|
Email address | |
| Number | A numeric input. |
label, placeholder, description, required
|
Team size |
| Long text | A multi-line text input. |
label, placeholder, description, required
|
Account registration request reason |
| Dropdown (single-select) | A dropdown where the developer chooses exactly one option. Requires at least one option. |
label, placeholder, description, required, options (list of value/label/selected)
|
Department: Sales, Support, Engineering |
| Dropdown (multi-select) | A dropdown where the developer can choose more than one option. Requires at least two options. |
label, placeholder, description, required, options (list of value/label/selected)
|
Topics of interest: API Gateway, Service Mesh, Developer Portal |
| Checkbox | A single boolean checkbox. Commonly used for terms acceptance, since the label and description both support inline Markdown links. |
label, description (supports Markdown links), required
|
Terms and conditions acceptance |
| Submit | The submit button for the form. Exactly one is required per form. |
value (button label, defaults to “Create account”)
|
Submit button |
Developer email customization
You can customize both the email domain and content of emails that developers receive for the following events:
- Welcome (developer sign-up approved)
- App registration approved
- App registration rejected
- App registration revoked
- API key expired
- API key expiring soon
- Confirm email address
- Reset password
- Account access rejected
- Account access revoked
To configure email customization settings, go to your Dev Portal, click Portal Editor, and then click the Email icon in the sidebar.
In the customization settings, you can use variables. For example, {{application_name}} will be replaced with the name of the application in the email.
The following table contains the variables you can use when customizing emails:
|
Variable |
Description |
|---|---|
{{api_documentation_url}}
|
The documentation URL for the API. |
{{api_name}}
|
The name of the API. |
{{api_version}}
|
The version of the API. |
{{application_name}}
|
The name of the developer’s application. |
{{credential_name}}
|
The name of the key auth credential. |
{{credential_expires_at}}
|
The date when the key auth credential expires. |
{{dev_portal_reply_to}}
|
The Dev Portal reply-to email address. |
{{developer_email}}
|
The email address of the developer. |
{{developer_fullname}}
|
The full name of the developer. |
{{developer_status}}
|
The Dev Portal status of a developer. For example, "approved", "pending", or "revoked". |
{{portal_display_name}}
|
The display name of the Dev Portal. |
{{portal_domain}}
|
The URL of the Dev Portal. |
Customize the email domain
If you want to change the from and reply-to email domains, you can configure a different domain through Dev Portal settings. Navigate to your Dev Portal, click Settings in the sidebar and click the Custom domains tab. Click New email domain and configure the settings.
Once you’ve added your new domain, you must add the CNAME records to your DNS server.
Certain domain names are restricted. See Domain name restrictions for more information.
Frequently asked questions
How do I customize the reply-to and from for Dev Portal emails?
To customize the reply-to and from, do the following in the Konnect UI:
- Set up a custom domain in Dev Portal.
- In the Portal Editor, navigate to the email settings.
- Click Email notification settings.
- Enter your from name and email. Reply-to email is optional.
Alternatively, you can use the Dev Portal API:
-
Send a POST request to the
/portals/{portalId}/custom-domainendpoint: -
Send a POST request to the
/portals/{portalId}/email-configendpoint:curl -X POST "https://us.api.konghq.com/v3/portals/$DEV_PORTAL_ID/email-config" \ --no-progress-meter --fail-with-body \ -H "Authorization: Bearer $KONNECT_TOKEN" \ --json '{ "domain_name": "example.com", "from_name": "KongAir", "from_email": "user@example.com", "reply_to_email": "admin@example.com" }'